A-feed Plugin Instructions
Content:
- OVERALL INFORMATION
- DATA SOURCE
- WORKING WITH RSS FEED CONTENT AREA AND VIA DIRECT LINK
- WORKING WITH A CONTENT AREA WHEN THE DATA SOURCE IS A NEWS FEED
- ADVANCED WORK WITH THE CONTENT AREA
- OVERWRITING IMPORTED POSTS FROM SOURCE
- SETTING THE AUTO UPDATE MODE
- SETTING UP TRANSLATION THROUGH YANDEX.CLOUD
- SETTING UP TRANSLATION VIA GOOGLE
Что-то не получается? Воспользоваться услугой технической консультацией.
Программист подключится к вашему сайту и настроит работу A-Feed. Стоимость данной услуги – $100/час.
OVERALL INFORMATION
Starting with version A-Feed 2.0.1, you can import data not only from RSS feeds, but also from regular website pages.
Before proceeding with the selection of a source, pay attention to a number of important conditions and restrictions that you may encounter in the process of work:
- Always try to host the plugin on your SSL (https) certified site to avoid getting security exceptions.
For example
Many sites will not trust your source without a verified security certificate.
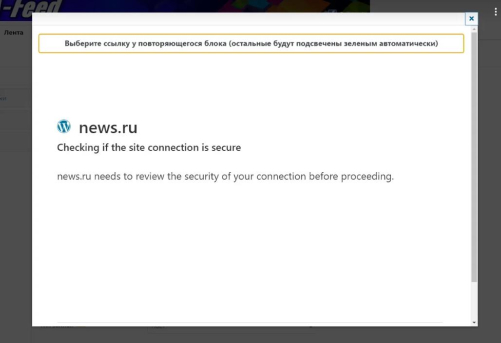
- NOT ALL sources can be processed. The link may return an empty result, or access is denied or a suspicious resource during the selection step in the "Data Source".
An example of a site that silently ignores requests after determining that it is not a person:

- Keep in mind that some sites may take a long time to respond due to high traffic. Check them before that in the browser.
- Some sites can change data dynamically, and at the time of parsing, you can see the “EMPTY CONTENT” error in the logs, although the url itself opens in the browser, i.e. it appears and disappears, it is within the normal range.
DATA SOURCE
There are three options in the settings for selecting a source:
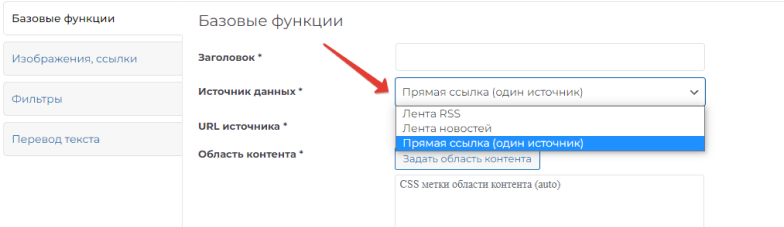
- RSS Feed - Data is copied from an RSS feed. You must enter the address of the RSS feed as the address.
- News feed - data is taken from the page of the donor site, where articles of the same type are accumulated. For example, the "News" page. In this case, a link to this section is entered in the URL field.
- Direct link (one source) - only a single page of the site is parsed. Enter the URL of this page.
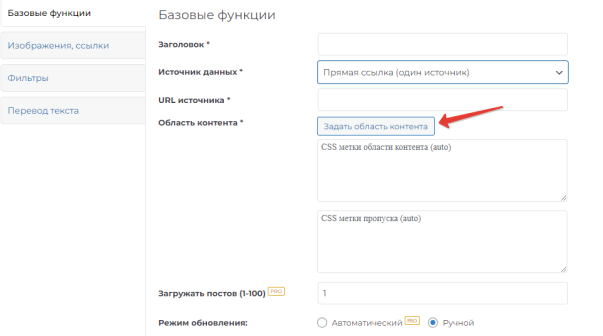
WORKING WITH RSS FEED CONTENT AREA AND VIA DIRECT LINK
Specify the source (RSS feed address or page address). Click the "Set content area" button:
Next, in the window that opens, select the blocks that will be copied. They are highlighted in green. And with a second click - those areas that need to be excluded from parsing. These areas are highlighted in red:
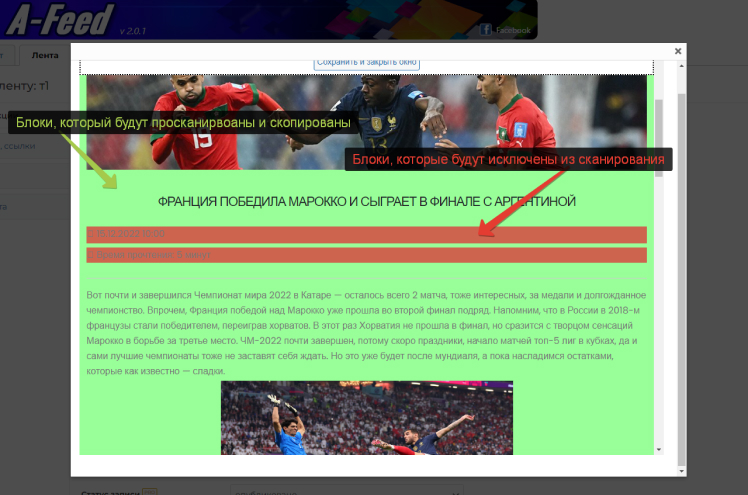
Upon successful processing of the source, the content of the tape will be loaded, in which, by clicking the mouse, we first set the main area, highlighted in green, and, if necessary, exclusion blocks, highlighted in red.
Clicking again on a previously selected area will deselect it. When you click on the green zone, the ignored areas previously set in it will also be canceled.
Exclusion blocks can only be placed in the main area. There may be several such blocks.
Please note that some blocks of the loaded site that you have marked as ignored can be created dynamically and not processed during import. Because with each request, the block changes its key data. Or the area may have a fixed layout without classes and identifiers, which can also prevent them from being skipped during import.
Try to choose the main area not the entire width of the site - but as close as possible to the content you need.
WORKING WITH A CONTENT AREA WHEN THE DATA SOURCE IS A NEWS FEED
As already mentioned above, as a URL, you must specify a link to the page where the records necessary for parsing are collected. There should actually be at least two per page.
The structure of such a page should be like this:
Announcement1 more
Announcement2 more
etc.
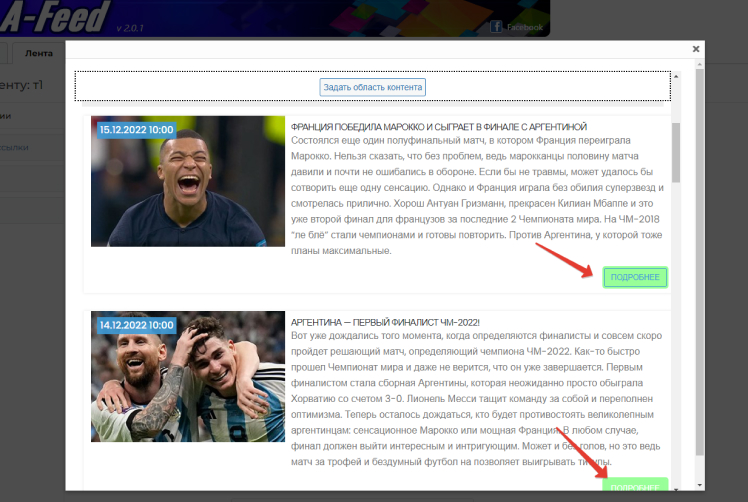
When you click on the “Set content area” button, a page with a list of such entries will open. You must select one any link to continue this entry. This can be a click on “Next”, on the image or title of the entry, if they are links to the entry itself.
Selected blocks are highlighted automatically:
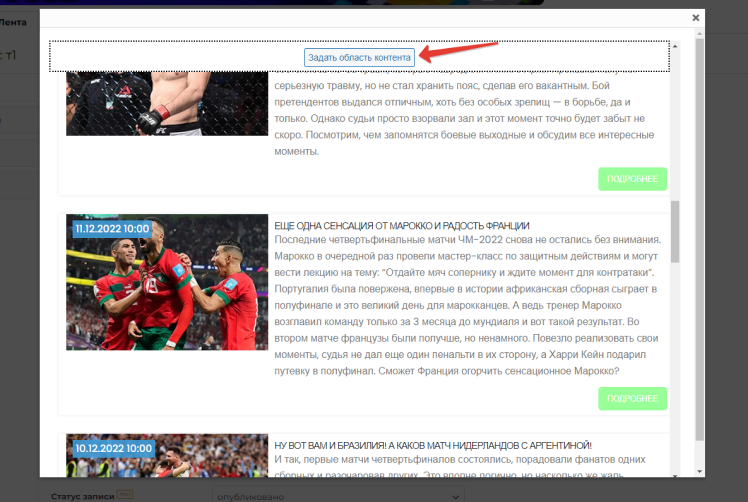
Then you need to click on the “Set content area” button:
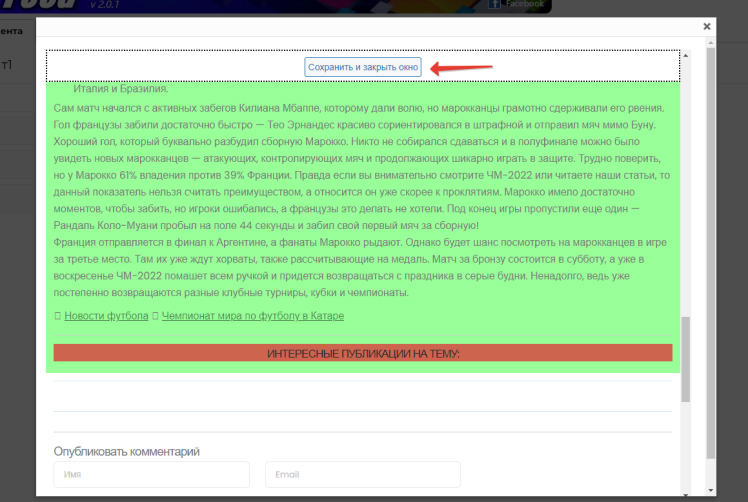
One of the entries will open. In it, it is necessary to select the areas required for parsing and exclude those that do not need to be scanned. Just like in the case of an RSS feed or a separate article. Then click on the “Save and Close” button:
ADVANCED WORK WITH THE CONTENT AREA
The guidelines in this section will help you more accurately select the area of content on your source page that best suits your site's needs. Only proceed with the recommendations below if you are sure of what you are doing, as some steps can lead to errors.
When previewing - always check different pages:

that parseing normally.
If the rest of the pages or all of them give an empty result:
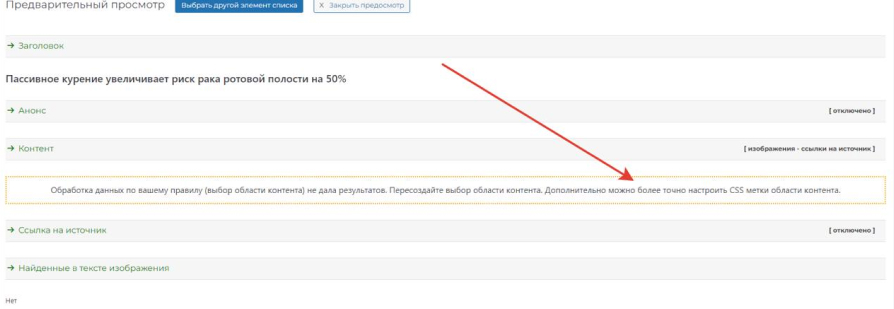
then you can customize the "CSS labels of the content area" as an example looks like this, a sample:
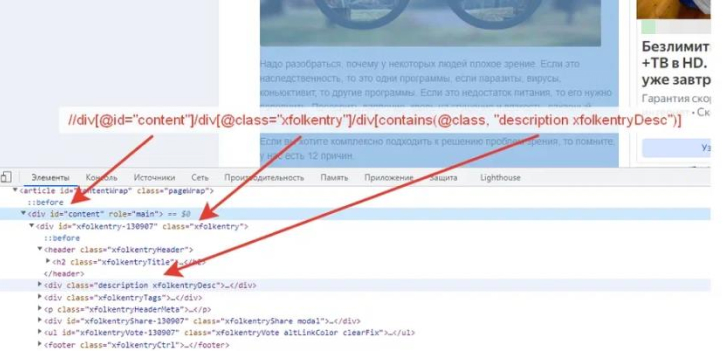
//div[@id="content"]/div[@class="xfolkentry"]/div[contains(@class, "description xfolkentryDesc")]
It is processed according to XPATH rules (you can give a link).
- - Rule always starts with // (first root element)
-
- further div[@id="content"] it means tag with attribute id="name/self" (can be any other attribute)
- - then a separator / slash indicates that a nested next element follows, etc.
those it turns out our green selection area is given by this rule, here is an example code for the above data:
<div id="content">
   <div id="xfolkentry">
      <div id="description xfolkentryDesc">
          … Это наши данные которые мы извлекаем ...
      </div>
   </div>
</div>
You can view this code at the page by clicking the code inspector in the browser:
So, in some cases, you can more accurately catch the required block by deleting the block (s) in the rule
/наименование_тега[атрибуты]
for example, remove the far right from the sample:
//div[@id="content"]/div[@class="xfolkentry"]
or, for example, shorten the rule by removing the first two blocks from the sample:
//div[contains(@class, "description xfolkentryDesc")]
Don't forget that the whole block always starts with two oblique lines //
Also, internal names can also be changed / deleted
for example, how wrong (there should not be empty)
//div[@id=""]/div[@class="xfolkentry"]
or so
//div[@id="content"]/div[@class=""]
The system automatically deletes such empty blocks when parsing.
Here is an example of changing the attributes of a sample:
//div[@id="content"]/div[@class="xfolkentry"]/div[contains(@class, "я_изменил xfolkentryDesc")]
Here is an example of code that cannot retrieve page data
//div[@id="container"]/div[@class="l-gradient-wrapper page-12987"]/div[@class="g-middle"]/div[@class="g-middle-i"]/div[contains(@class, "news-content js-scrolling-area")]/div[@class="news-wrapper"]/div[@class="news-posts"]/div[@class="news-container"]
Notice the attribute "page-12987". In our example, it specifies that the class is explicitly dynamic for each new page and the rule will not work because it will be changed. What can be done:
//div[@class="g-middle"]/div[@class="g-middle-i"]/div[contains(@class, "news-content js-scrolling-area")]/div[@class="news-wrapper"]/div[@class="news-posts"]/div[@class="news-container"]
option 1: we delete the block itself and all its previous ones from the beginning, an example of what happens:
//div[@class="g-middle"]/div[@class="g-middle-i"]/div[contains(@class, "news-content js-scrolling-area")]/div[@class="news-wrapper"]/div[@class="news-posts"]/div[@class="news-container"]
option 2: remove from the tail all the final ones and the problematic block itself, an example of what happens:
//div[@id="container"]
With the second option, the parser will be “greedy” - because this block can contain other blocks — ads, columns, widgets, and so on. And usually more information gets into the area of copying.
OVERWRITING IMPORTED POSTS FROM SOURCE
These settings are changed in the “Received data” item and have 4 options:
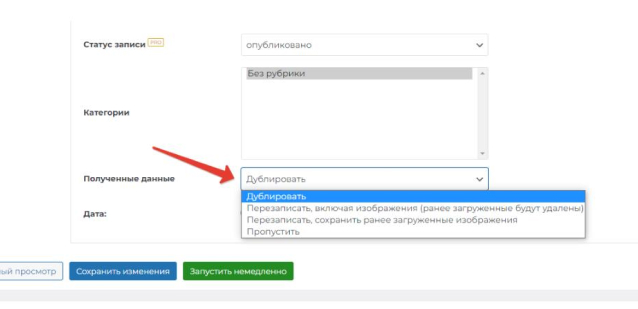
- Duplicate. In this mode, if the A-Feed plugin encounters a record with the same name during scanning, it creates a duplicate of it.
- Overwrite including images. The entire recording will be completely overwritten. Including all images in it. If any new images have been added manually, they will be removed.
- Overwrite, keeping previously downloaded images. Similar to the previous point, but the images will be saved. This item provides a uniform and classic content for your site, without creating duplicates.
- Skip. If A-Feed finds a post title in the source that is similar to the one on your site, it skips that post and moves on to the next one.
By default, the plugin is in "greedy" mode, namely: with each new/restart of feed parsing or automatic mode, duplicate posts will be created. In this case, only the title of the document is taken into account and compared.
SETTING THE AUTO UPDATE MODE
The examples given are based on the BEGET site hosting settings. Similar settings are available on the vast majority of hosting sites.
You need to run a scheduled task (crontab) on your hosting.
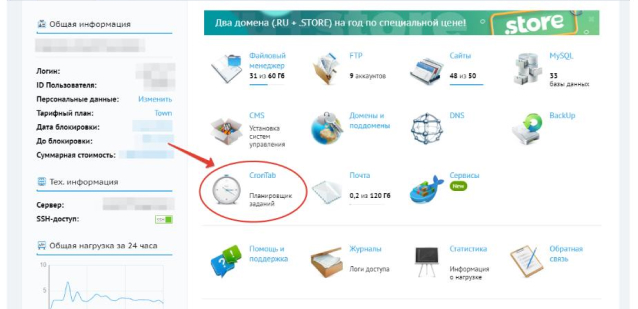
Plugin time requirements - execution every 10-15 minutes.
Can be set through the task scheduler:
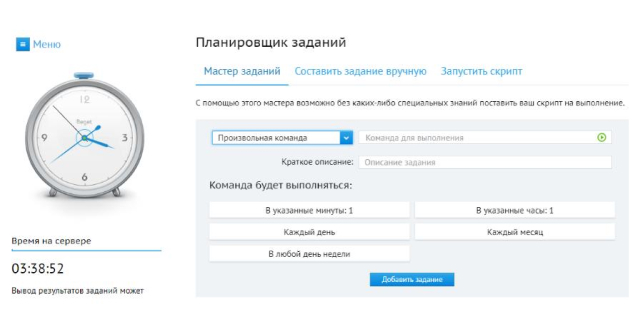
Or maybe as command. Example command for every 10 minutes:
*/10 * * * *
The command itself to execute:
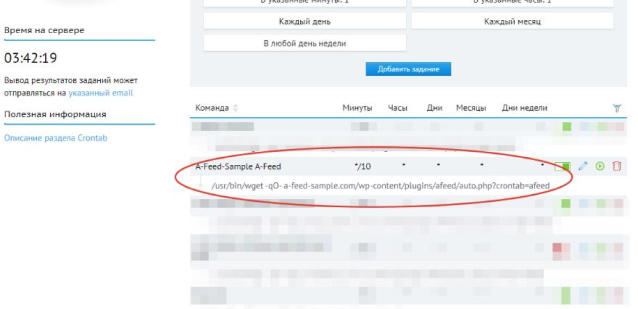
/usr/bin/wget -qO- ваш_домен/wp-content/plugins/afeed/auto.php?crontab=afeed
Where your_domain is the domain on which the plugin is installed.
An example indicating the domain, where our test site https://a-feed-sample.com/ is selected as the domain, where you can see how the A-Feed plugin works in combat:
/usr/bin/wget -qO- a-feed-sample.com/wp-content/plugins/afeed/auto.php?crontab=afeed
This is how it looks in the hosting control panel:
In case of performance problems - contact the technical support of your hosting.
SETTING UP TRANSLATION THROUGH YANDEX.CLOUD
To receive an OAUTH token and a service folder key, you must have your account at yandex.ru
- Create a Yandex account and log in
- Follow the link: https://cloud.yandex.ru/docs/iam/concepts/authorization/oauth-token
- In the sentence "You can get an OAuth token for working with Yandex Cloud using a REQUEST to the Yandex.OAuth service", click on the "REQUEST" link and get OAUTH:
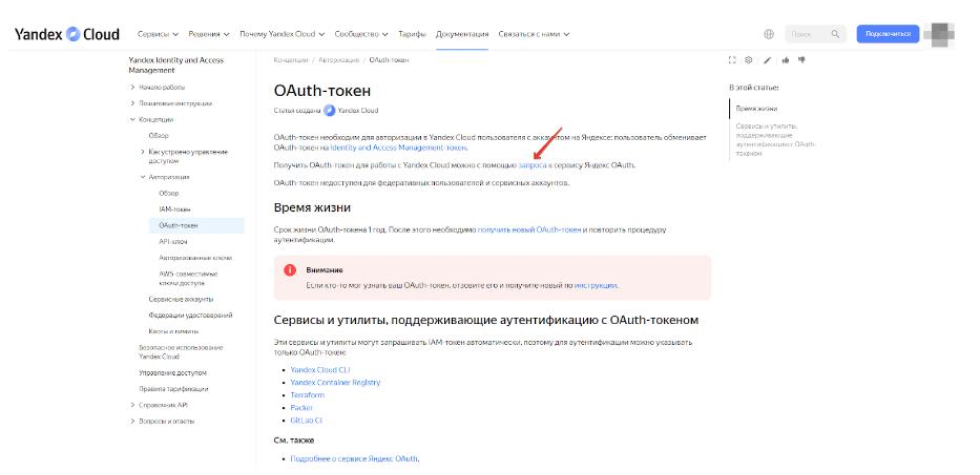
The resulting OAUTH will look like this:

A blank page with only your OAUTH key on it, nothing else.
- Activate a paid account following the Yandex instructions. Don't forget to top up your balance.
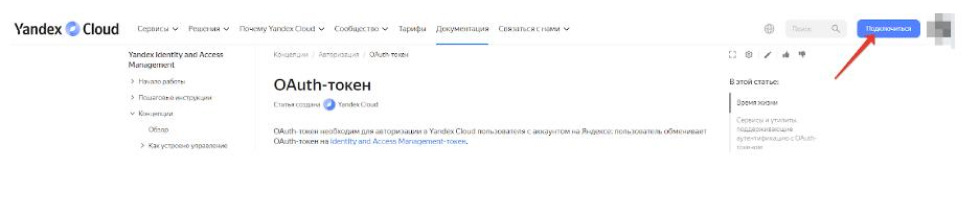
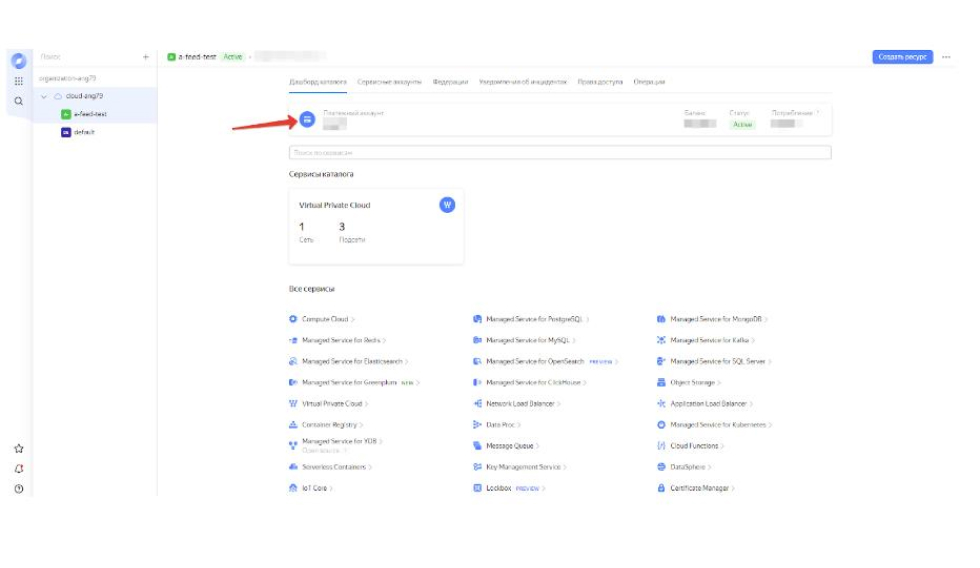
- Then follow the link https://cloud.yandex.ru/ "console" button
- Go to:
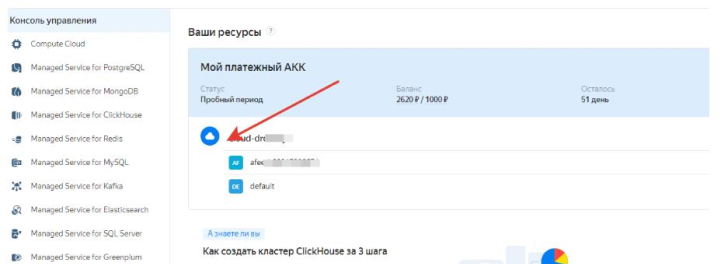
- Next, you need to select "Create directory":
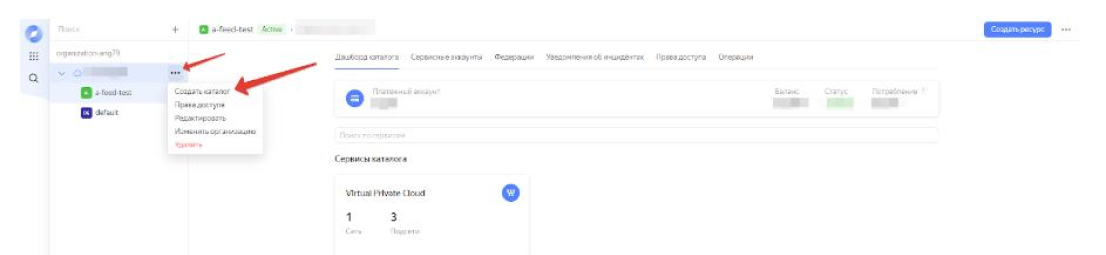
You must create a directory with any valid name.
- Copy the service folder key:
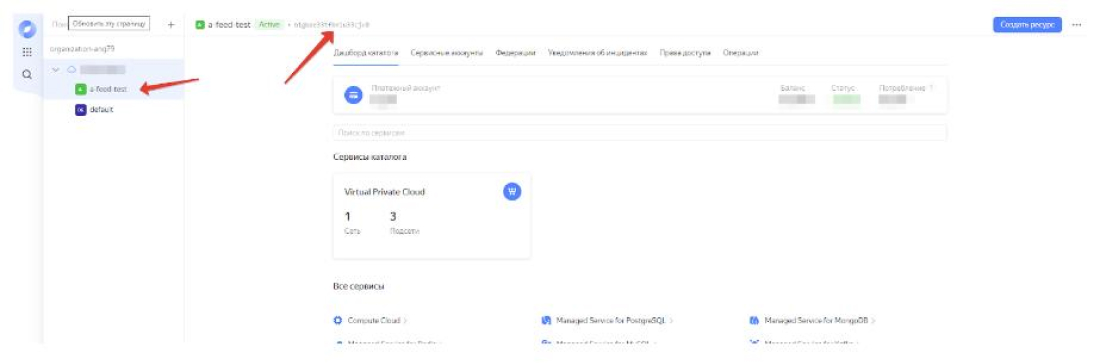
The received OAUTH and the key of the service folder must be entered in the corresponding fields of the A-Feed plugin settings:

SETTING UP TRANSLATION VIA GOOGLE
- Get a Google account and sign in
- Go to the Google.Cloud console using this link: https://console.cloud.google.com/
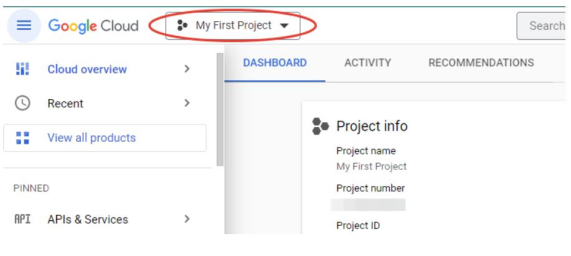
- Select a project, and then create a new one in the window that opens:
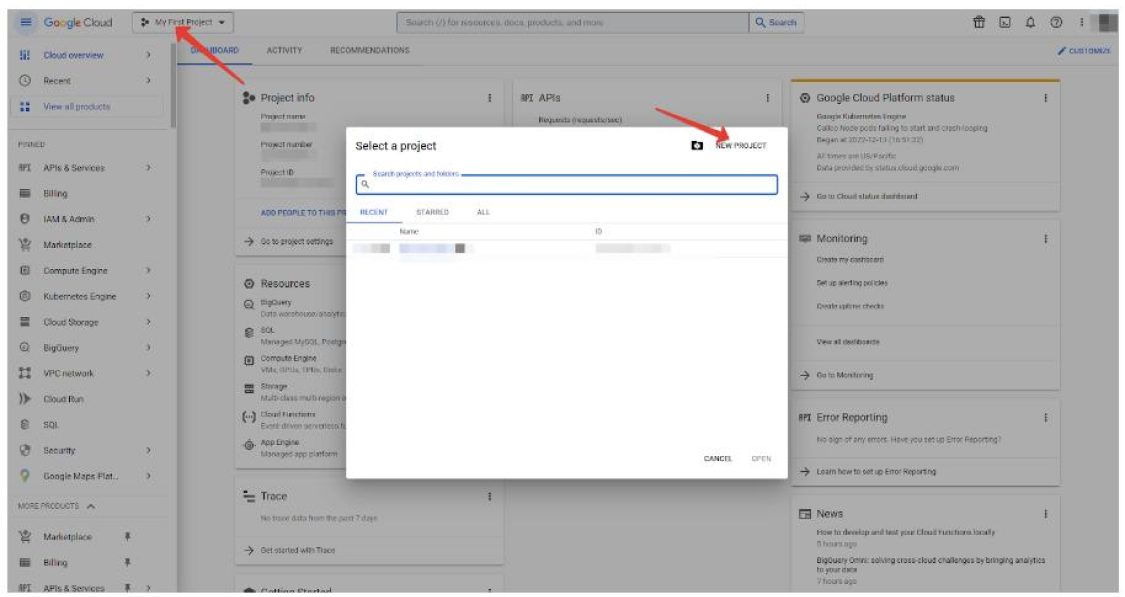
In our example, it is called My First Project. Select it (if it is not selected after creation) in the project selection window:
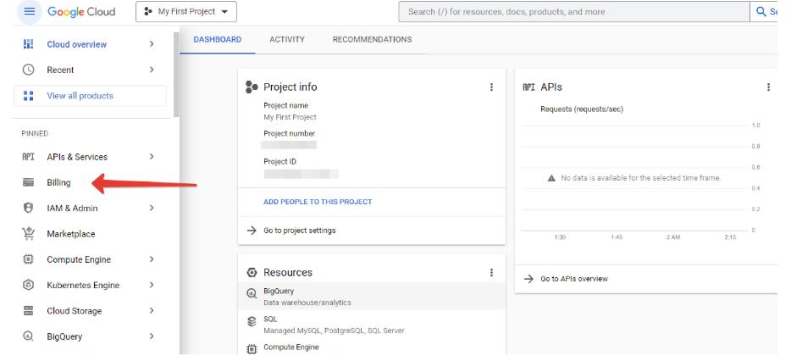
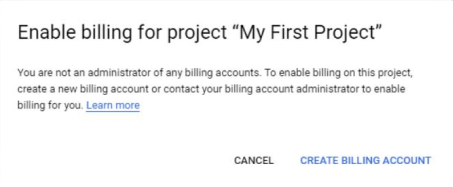
- We connect a valid bank card. There must be funds on it, usually it is debited and a small amount within $ 1 is immediately returned to check the card's performance. All this is done in the Billing section:
Create and link a billing account:
- It remains to get an API key, for which you need to follow this link: https://console.cloud.google.com/apis/library/translate.googleapis.com
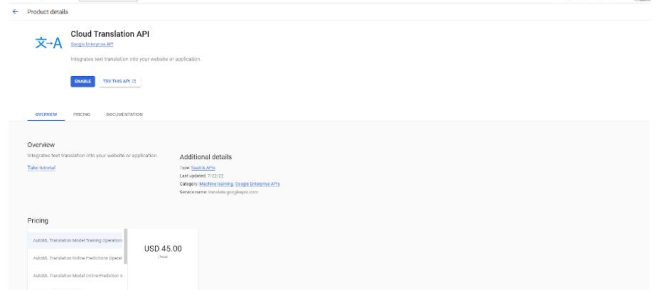
- Click on the Enable button:

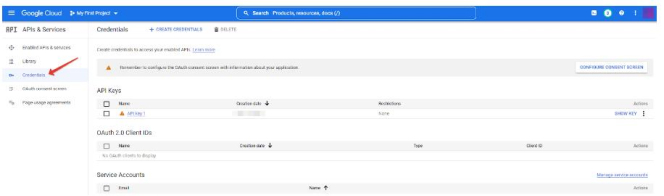
- (optionally, this item may not be available) Select your project and then (or immediately) get into the API management console, where you need to go to the “Credentials” tab:
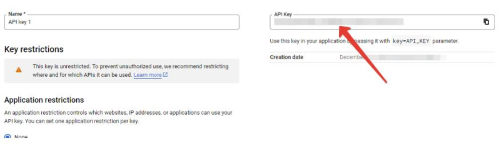
- It remains to click on the API key:
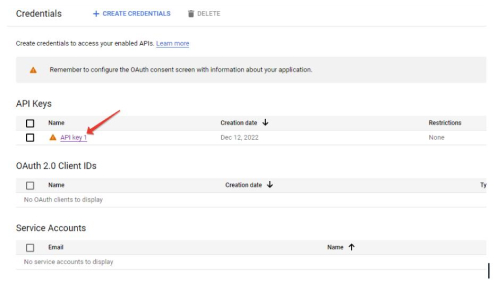
- It will be displayed in a new window: